

This site has been quiet for a while. During this time, I migrated the hosting platform again, and refactored email solution. This post, is another note about how I finally came to the most cost-effective web and email solution for a small business, with a solid security posture, and at nearly no cost.
For background, I have had this website for more than five years now, and revamped it a couple times. I have been with Amazon Lightsail at an already low cost. I didn’t have a lot of emails. So I have been relying on the email forwarding feature from my old domain registrar. There have been a few challenges. The content has grown a lot. The speed gradually slows down. WordPress needs reinstall. The outgoing emails get flagged as unverified.
WordPress Hosting
Worried about too many plugins, I debated about changing content management platform. Unfortunately, it’s not easy. There are some alternatives but none has all the features from all the plugins that I’ve been using. Even if they do, it would be too much work: I’d have to migrate the code snippets, highlights, etc, find similar themes and verify the new theme and new plugins work together. Despite of the criticism, WordPress today is still a predominant content management platform. So I stick to it.
Staying with WordPress isn’t maintenance-free. When PHP version has major update once in a while, I still had to re-install and migrate to a new server. Since I’ll exercise migration anyways, why not also shop around for a new virtual private server. Surprisingly I learned that Google Cloud Platform has an always-free tier including a decent size virtual machine.
| Amazon Lightsail 7USD/mo | GCP Free tier | |
| Class | micro | e2-micro |
| CPU | 2 vCPUs | 2 vCPUs |
| Memory | 1 GB | 1 GiB |
| Disk | 40GB SSD | 30 GB (standard persistent disk HDD) |
| Data Transfer | 1TB | 1GB egress |
The vCPU in different platforms do not represent exactly the same compute capacity, but should be generally comparable. The egress data transfer usage was below 1GB on Lightsail so the new service is sufficient. By going with GCP’s free tier, the only downgrade is the disk speed.
The GCP platform provides Bitnami package image and it’s fairly simple to spin up a new VM. The setup is as simple as Amazon Lightsail and I don’t have to deal much with networking. It doesn’t work out to be completely free but the net cost is negligible. I also picked the Nginx-based WordPress image because I had wasted a lot of time dabbling with Apache which I never use elsewhere.
WordPress Migration
With the new server up in a few minutes the next step is migration. The All-in-One WP Migration and Backup plugin (by ServMask) is the Swiss army knife. There are some pitfalls though.
First, the plugin has a size limitation in the free version. Luckily I can bypass it with changes to the PHP and Nginx configurations. For PHP configuration, change the line in /opt/bitnami/php/etc/php.ini, to upload_max_filesize = 512M. For the other change on Nginx as the reverse proxy, in /opt/bitnami/nginx/conf/nginx.conf, under http configuration, add:
client_max_body_size 512M;The second pitfall is trickier. I have to temporarily host the new site, either by an public IP, or by a different DNS name (such as new.digihunch.com), so I can log in and verify the functions. Once I log on to the new site, the new DNS name or IP will start to be written to the database. I’m not sure which exact service does that. But once I put the new site on the production domain name (i.e. www.digihunch.com), the database still contains many entries referencing the temporary DNS name. This causes many insidious broken links.
There is a plugin for this kind of issue: Better Search Replace by WP Engine. The plugin goes through all tables in the database and allows you to find and replace strings. It also supports dry-run mode and I managed to fix tens of thousands of bad references. In addition, I managed to change username using a plugin called Easy Username Updater.
Another important activity after migration, is to ensure the MFA by WordFence plugin continues to work, and re-scan the entire file system.
CloudFlare Security
With less egress data and an HDD, the VPS in GCP is slower. I need to speed it up with CDN. It is hard to resist the freebies by CloudFlare. I’ve already been using it for security. Now it’s time to dig deeper.
CloudFlare greatly simplifies TLS certificates. It manages your certificate automatically. On the other side, it issues an origin certificate (and key, with long expiry) for communication with origin server. In full encryption mode, all I need to do is deploy origin certificate to Nginx. There is no manual renewal effort.
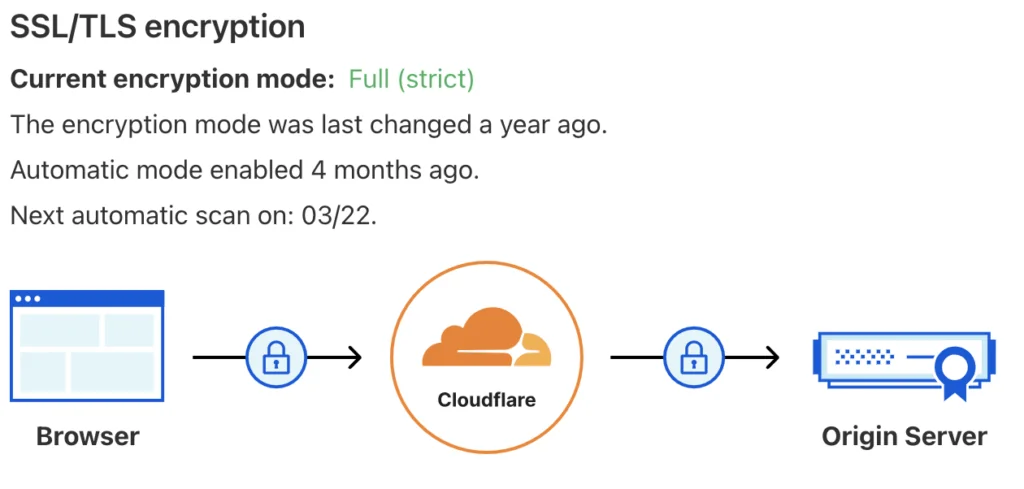
Note this setup requires CloudFlare to manage DNS so I just transferred my domain to CloudFlare. Therefore I consolidate domain registrar, certificate vendor and CDN to one vendor. CloudFlare can manage DNS record in proxy mode, to hide the public IP of the origin server from clients. I can also control the security group of the origin server to only open port 443 to CloudFlare IPs.
Another annoying but necessary configuration is the redirect of zone apex and http requests. Specifically most websites needs the following redirects:
- If request from client is http://www.digihunch.com, enforce https;
- If request is https://digihunch.com, redirect to https://www.digihunch.com;
- If request is http://digihunch.com, enforce https, then redirect following rule #2.
I used to manage the these redirects in the reverse proxy (Apache). Now that I changed to Nginx, I offload these settings to CloudFlare, instead of configuring another reverse proxy again. For #1, I simply turned on “Always use HTTPS” and “Automatic HTTPS Rewrites” under edge certificates. For #2, I need a CNAME for zone apex to alias to www, along with a redirect rule. As a result, there is no need to ever open port 80 on the VPS, just to let the reverse proxy redirect URL.
CloudFlare Cache Rules
As to caching, I had to turn on a couple Cache rules to enable the caching. Cache hit was at about 50% and there are rooms to go higher if I enable reserve cache. Once cache is on, there are other considerations, such as expiring the cache, and by passing the cache during server deployment. CloudFlare allows you to purge cache by rules. There is also a Development Mode that temporarily allows you to bypass all cache for testing. With cache enabled, and the WordPress plugin activated, the page load time for recent posts appear to be faster than before.
One challenge is that the admin bar of WordPress went into the CDN and is served to visitors. To get rid of this behaviour I have two catch rules:
- A cache-everything rule at order 1, to make everything eligible for cache;
- A bypass rule at order 2 to bypass cache conditionally. The condition expression reads:
(http.cookie wildcard "wp-.*") or (http.cookie wildcard "wordpress_logged_in_*") or (http.cookie wildcard "wordpress.*")To make use of the cache space. It is important to have small image sizes. Last year I added many AI generated feature images, most of which are 2MB in PNG format. I have to convert many PNG images into webp format, which only takes a fraction of the space and is widely accepted by most browsers today.
Sometimes there are other annoyances when it comes to speeding up page loading. For example, I noticed that with integration between Google Tag Manager and Microsoft Clarity, the home page issues a call to https://www.clarity.ms/tag/tag-id-xyz. This call blocks the rendering of a big chunk of home page by a minute! I didn’t notice it because my Brave browser’s ad-block removes that call. Nonetheless, the issue has been there for any visitor without built-in ad-block in their browser. The lessons learnt is that you always test with standard browsers, or at least in Brave browser with shields down.
SMTP service
I have been using email forwarding for incoming emails, and Gmail’s feature to send email from a different address or alias, for outgoing emails. This feature works but oftentimes the email gets marked as unverified on the recipient side. That gives it a good chance to appear as spam.

I need similar email forwarding mechanism and sending service. The free tier of CloudFlare goes a long way. Receiving is simply about creating Email routing rules, with a few MX and TXT records on DNS created and managed by CloudFlare. These records ensure CloudFlare routing rules captures all emails coming to the domain.
For outgoing emails, I have to get rid of the alias-based mechanism by Gmail. I need a proper SMTP server but CloudFlare doesn’t offer one. Resend seems like a popular choice with a good amount of free tier usage. However I’m hesitant to introduce another single-purpose platform so I just resort to Amazon SES for a full-feature, low-cost SMTP service. I do have to request production access, stating the server is for transactional email. This allows the SMTP service to arbitrary recipient address.
The other benefit of having my own SMTP server is to enable email integration in WordPress, which enables other important features such as web form, WordFense security alert and admin password reset by email.
Sending Reputation
To keep outing email from being marked as spam, it is important to understand what mechanisms are at play (SPF, DKIM, DMARC) to maintain sending reputation. At minimum, we configure SPF, DKIM and DMARC. SPF (Sender Policy Framework) identifies which mail servers are allowed to send mail on behalf of your custom MAIL FROM domain through a DNS TXT record that is used by DNS. The receiving mail server checks the SPF record of the sender’s domain to see if the email came from an authorized server. For example, when I use the SMTP server by Amazon SES, and customize the MAIL FROM field to mail.digihunch.com, I need an MX and a TXT record for mail.digihunch.com to tell receivers that it authorized amazonses.com to send email on its behalf.
DKIM (DomainKeys Identified Mail) is an email authentication method used to verify that an email message was sent by an authorized mail server and that the message content hasn’t been altered in transit. When an email is sent, the sending mail server generates a unique digital signature (based on the content of the email) using a private key. This signature is added to the email header. DNS Lookup: The receiving mail server looks up the sender’s domain in DNS to find the corresponding public key for DKIM authentication. Amazon SES configuration requires three TXT records to store the sender’s key information.
With SPF and DKIM configurations, the Amazon SES setup complies with DMRAC authentication protocol, making it less likely to be flagged as spam. The email comes off as mailed by amazonses.com and signed by digihunch.com.
In addition, there is Brand Indicators for Message Identification (BIMI) protocols that enables logo for your email on the recipient’s inbox. I managed to set up BIMI with SES, without Verified Mark Certificate (VMC), a protocol that requires evidence of ownership of the logo.
Although SPF, DKIM and DMARC cannot guarantee the email is not marked as junk, this is the best thing you can do. There are other techniques with diminishing return on effort.
Summary
This post summarizes my journey to land on the leanest web and email hosting solutions for small business. After five years of improvement, the tech stack that brings me low cost, solid security posture and lightening-fast speed, consists of: virtual machines from Google Cloud Platform (or Lightsail from AWS), web security and CDN by CloudFlare with Email supported by Gmail and Amazon SES (or Resend).
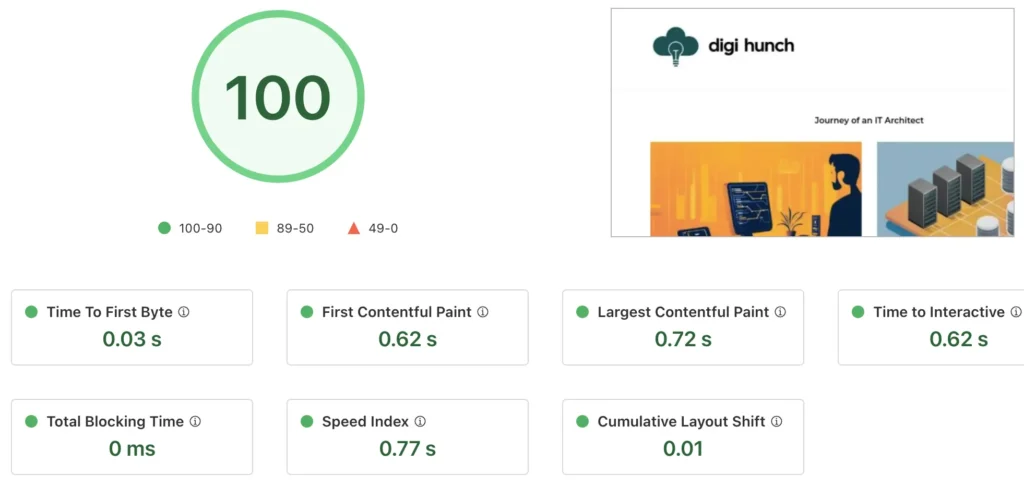
Initially with GCP, I tried to stick to the free tier but I did notice the standard persistent disk struggling, especially when I run system scan from WordFence. To overcome that I upgraded the disk to balanced disk (SSD backed) out of the free tier. There might be even cheaper alternatives but the marginal value isn’t worth the effort. Also, I configured the caching in CloudFlare for read, adjusted the home page, and schedule IO-intensive activities such as bi-weekly snapshot to quiet hours. The combination gave the site a 100 score in the CloudFlare speed testing.