Background
“We want to host Postgres database on Kubernetes. Can you help us?”. The client appears assertive and reluctant to resort to managed services. So I did some homework and went through this tutorial. My thought: it’s doable, but don’t do it unless operating database as a service is your main business.
I believed that was the client’s best interest, until I came across this the blog post A Case for Databases on Kubernetes from a Former Skeptic. The author explained his journey from being a skeptic, to grudging acceptance, and eventually to an evangelist on running database on Kubernetes. The same voice came from the author of the upcoming book Managing Cloud Native Data on Kubernetes, who also advocates hosting database on Kubernetes. While the points in the chapters are valid, the book also includes a good amount of technical details which might lead reader to believe the opposite view.
Just a few years back, Kubernetes was not mature to host database. This is changing in 2022. Nowadays, for clients with their own Kubernetes platform, technological maturity is no longer the main reason that keeps them from hosting database on Kubernetes, it is the operational cost. The operational cost has to do with whether the client has in-house expertise in database and Kubernetes. If they do, the hard path makes economical sense.
In this post, we discuss what we need to be aware of in order to host database on Kubernetes.
Benefit with Kubernetes
The first few versions of Kubernetes only supported stateless workload (reference documentary). That is what Kubernetes was born to solve. Built-in objects such as replicaSet, deployment, horizontalPodAutoscaler are abstractions of operations particular to stateless workload. Pods for stateless workload are ephemeral: they crash and get replaced at any time. Because they don’t carry persistent data themselves, they are expendable.
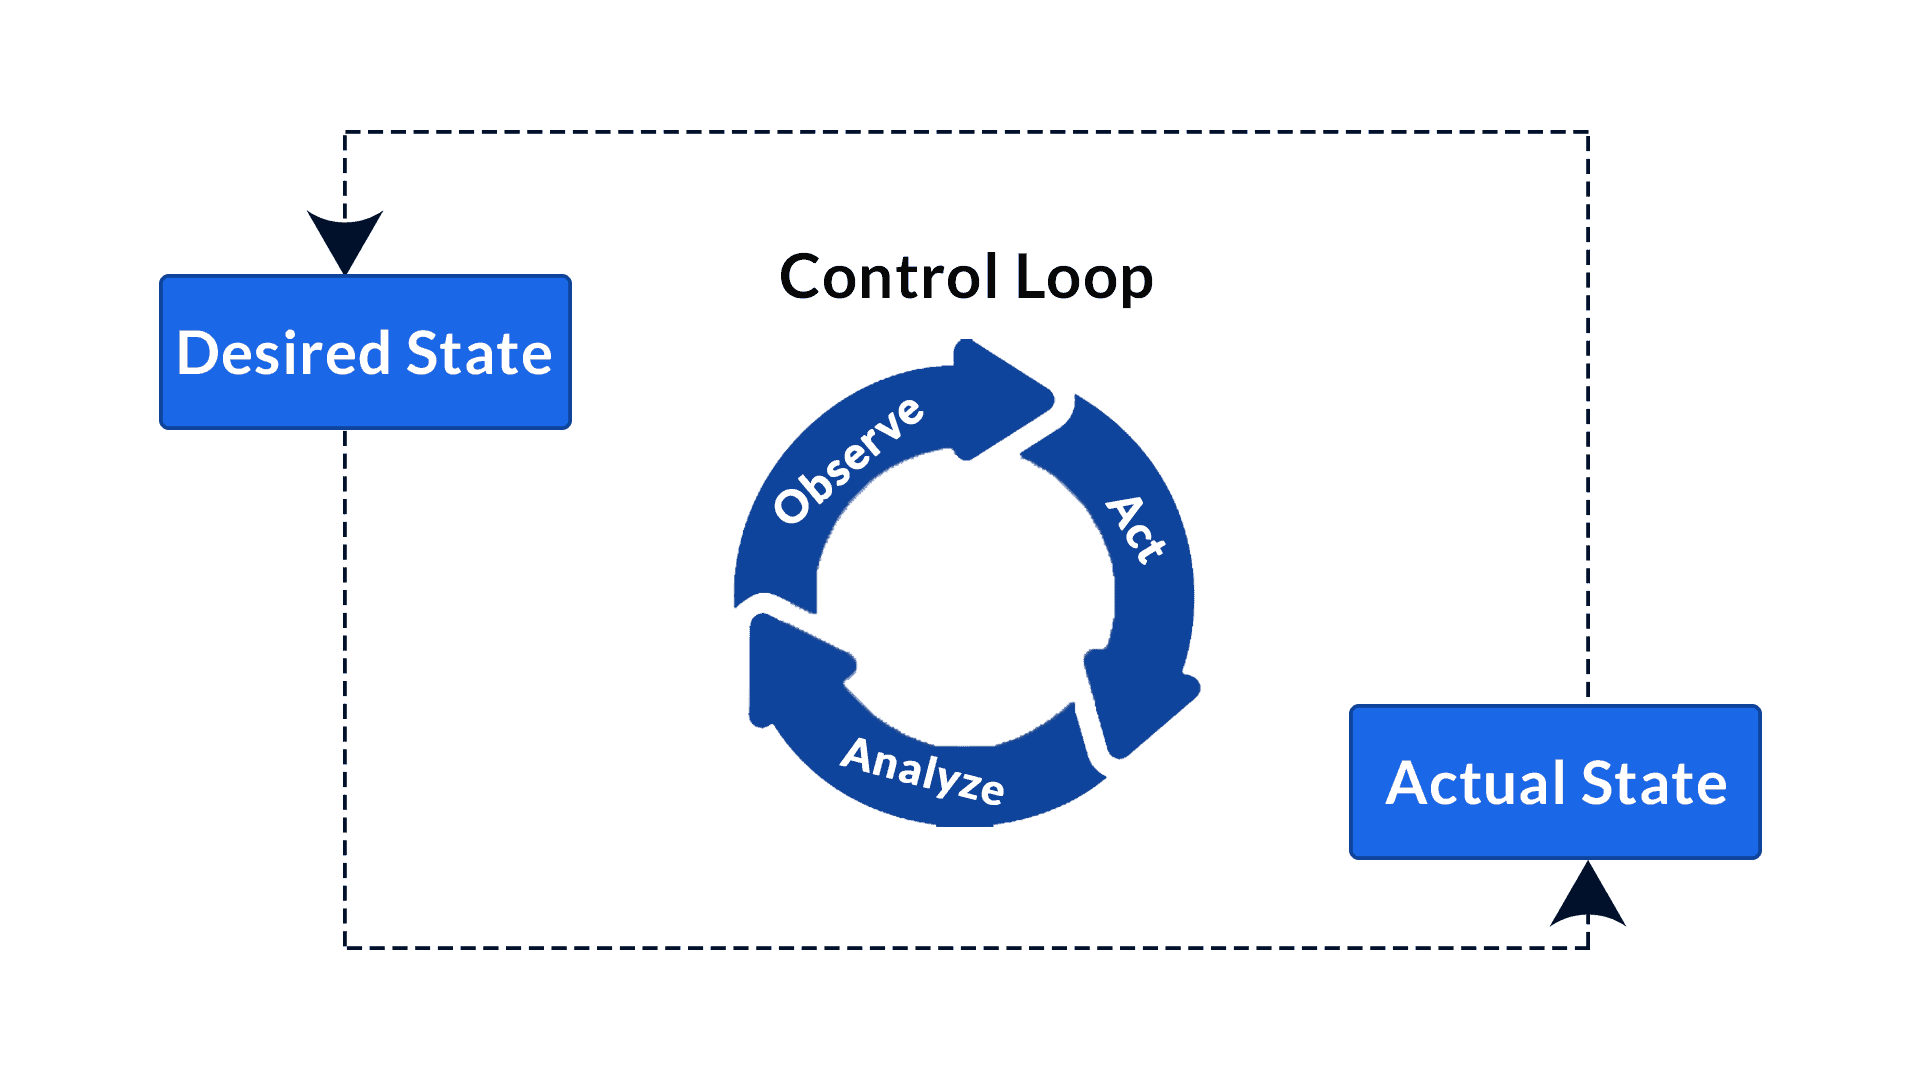
Kubernetes’ orchestration capability are driven by controllers. As discussed, the controller pattern is adopted in all controller implementations. They are the engines of the platform that works tirelessly in a control loop to ensure desired states matches their declared states. This is a key feature of Kubernetes as container platform. Let’s examine a web service that requires 5 instances behind load balancer. With traditional hosting model on Linux servers, you’d have it installed on all five VMs. If the process on one of the VMs dies, the VM has to be removed from the load balancer’s target pool.
One may wrap the process with process monitor and control utility such as supervisord, and re-install the application using automation utility (e.g. Ansible). However, each server is unaware of the status of its peer. Without a central “Control Plane”, there is no coordination between the activities of each VMs. Kubernetes controller solved all these operational problems.

Kubernetes comes with a set of build-in controllers that run inside the kube-controller-manager. Here is a good page about how controllers work. Controller is what is missing in many automation tools other that Kubernetes. Even though Red Hat now brands Ansible as Automation Controller, it does not involve a control loop or controller pattern. If there’s one thing that sets Kubernetes apart from other hosting platforms and automation platforms, it is the implementation of controller pattern.
Stateful workload
Does the controller pattern also benefit stateful workload? Yes. How to orchestrate Pods for stateful workload is usually more tricky. CRD can define a custom object type for controller to consume. In this case, an operator is an implementation of the controller pattern. This pattern is also known as the operator pattern. In a replicaSet, Pod names have extensions of randomly generated numbers. A statefulSet names its the Pods by sequential numbers.
For Postgres database, Bitnami built a good Helm Chart to install the database automatically. However, it does not have a control loop. If someone changes the workload after initial installation, the change is not monitored or controlled by any controller. This is a disadvantage of Helm chart as compared with operators. For PostgreSQL, there are a number of operators, the most notable being PGO (Postgres Operator) from Crunchy Data.
To install an instance of PostgreSQL database, we need to install the operator, and then declare a Custom Resource using the PostgresCluster CRD. The operator will set up the cluster according to the declaration made in the PostgresCluster CR. I used the quick start guide to bring Postgres up real quick on an Azure Kubernetes cluster. The operator (v5) supports common cloud Kubernetes platforms (GKE, EKS, AKS), VMware Tanzu, Openshift, Rancher, Kubernetes. It does not explicitly indicate whether PGO supports Minikube or kind.
So far, I’ve discussed the pros of running PostgreSQL on Kubernetes using Postgres Operator. We can describe the database deployment in a CR and the controller (operator) will monitor the resource incessantly to ensure the actual state matches the state defined in the CR. Not only is it doable to host database in Kubernetes, it makes our lives even easier.
Persistent storage
Database is not only a stateful workload, it also has special requirement on storage. It needs to persist data, support ACID transaction, and make optimal use of disks. When we operate everything on premise, we use fibre cable with a SAN as the storage media for database file. The operating system allows the database process to interact with blocks on the storage volume via device mapper.
In Kubernetes, we need to give Pods persistent volumes. There are a few APIs: Storage Class, Volume Storage Class, Persistent Volume and Persistent Volume Claims. Storage Class represents how Pod can connect to a storage. Pods will need PVCs in order to read and write on PVs. However, since Pods are ephemeral – a Pod may crash any time, even if it is in the middle of writing to a PV, during an ACID transaction. The scheduler may reschedule the crashed Pod to a different node. Then it will need to pick up the PV from where it left off, on the new Node.
Take Azure Kubernetes Service for example, a few storage classes are available by default, backed by Azure managed disk (managed-csi) or Azure file storage (azurefile-csi):
| StorageClass | Azure storage service | |
|---|---|---|
| in-tree | default | Managed Disk using Azure StandardSSD |
| managed-premium | Managed Disk using Azure Premium Storage | |
| azurefile | Azure File Share using Azure Standard Storage | |
| azurefile-premium | Azure File Share using Azure Premium Storage | |
| csi | managed-csi | Managed Disk using Azure StandardSSD |
| managed-csi-premium | Managed Disk using Azure Premium Storage | |
| azurefile-csi | Azure File Share using Azure Standard Storage | |
| azurefile-csi-premium | Azure File Share using Azure Premium Storage |
If we use storage class based on Azure disks to create a PV, only one Pod can use the PV. If we use storage class based on Azure files to create a PV, then the storage is mounted as NFS (Linux) or SMB (Windows) share. File storage is not a valid use case for database workload and it can significantly degrade database performance. When I tried to use a file-storage based CSI with PGO, the Pod reports an error and will not start properly. We should use Azure disk based CSI storage classes. That leaves us with two options: managed-csi and managed-csi-premium.
High Availability
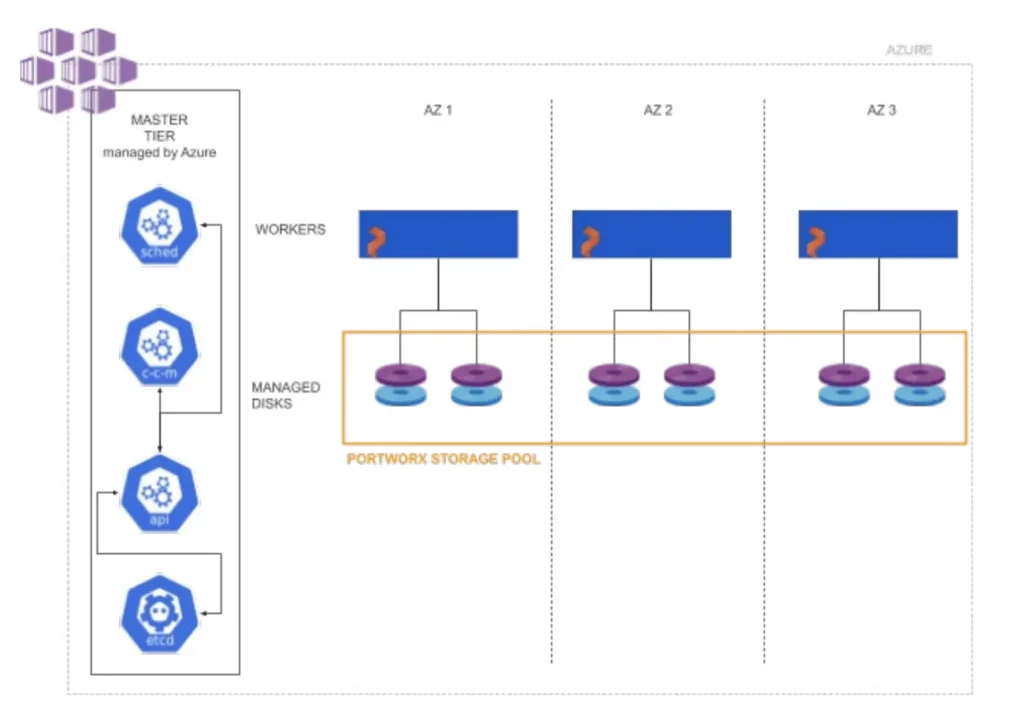
Even with these to options left, we still have to investigate how database Pods interact with persistent volume for high availability, in order to determine whether any of the options are suitable. The two storage classes differ by disk performance but both have its own limitation with multi-AZ support on Azure managed disks. When the cluster operates across zones, the Kubernetes scheduler may reschedule a Pod crashed in one zone to a Node in a different availability zone (a different data centre). Even though the managed disks, when attached to VMs, can be configured as zone-redundant, when they are used as Kubernetes volume, they are NOT zone-redundant. So the node in a different zone will not be able to attach PV to the new Pod.
There are SDS (software-defined storage) solution such as Portworx that solves the limitation of Azure disk for cross-region storage volume. The SDS layer brings managed disks from multiple availability zones into a pool. This storage pool acts as a highly available, cross-zone storage tier presented to AKS as persistent volumes. We can install Portworx as the SDS layer using Portworx operator. To do so, we first have to configure grant the cluster the permission to provision resources in Azure, because the Portworx operator will use node’s identity (kubelet identity) to provision Azure resources on behalf of the nodes. Portworx will provision Azure disks and acts as the intermediary layer.

Apart from cross-zone high availability enabled by PX-Store, Portworx can also help with cross-region replication of persistent volumes. The PX-DR component can perform asynchronous replication across Azure regions. The destination region needs to have its own cluster because a single AKS cluster cannot span across regions.
Storage Class
Once we have portworx installed, the following storage classes are available by default:
- px-db
- px-db-cloud-snapshot
- px-db-cloud-snapshot-encrypted
- px-db-encrypted
- px-db-local-snapshot
- px-db-local-snapshot-encrypted
- px-replicated
- px-replicated-encrypted
The steps for installing porworx on AKS are documented here. This blog post has more details in the installation process on a different platform. We can also built CSI based storage classes with different IO priority and replication factors.
In summary, Kubernetes operator pattern makes it easier to manage stateful workload. However, database performance depends largely on storage. To host database on Kubernetes, one will have to also manage the storage volumes on their own. There has not been a study on the impact to performance by moving database to Kubernetes platform. However, I only expect a degraded performance due to the layers introduced.
Example
In this section we configure a (minimally viable) PostgreSQL cluster using Crunchy Data pgo to demonstrate the idea. The steps are based on its tutorial but it works on a local KinD cluster. As discussed in a previous post, I use KinD for testing workload requiring persistent storage because Minikube has this open issue with permissions on PVs with multiple nodes.
To prepare the cluster, we can use kind-config.yaml file from my real-quicK-cluster repo:
kind create cluster --config=kind-config.yaml
# to delete cluster after testing: kind delete cluster --name kind
We use Helm to install the operator. Since the Helm chart is not hosted in a public repo, we’d have to download the directory of the Helm Chart.
git clone https://github.com/CrunchyData/postgres-operator-examples
cd postgres-operator-examples
helm install -n postgres-operator --create-namespace crunchy-pgo helm/install
kubectl -n postgres-operator get po --watch
kubectl explain postgresclusters
Now we can create a YAML file for the Custom Resource and let’s call it test-cluster.yaml with the following content:
apiVersion: postgres-operator.crunchydata.com/v1beta1
kind: PostgresCluster
metadata:
  name: hippo
  namespace: postgres-operator
spec:
  backups:
    pgbackrest:
      image: registry.developers.crunchydata.com/crunchydata/crunchy-pgbackrest:ubi8-2.38-1
      repos:
      - name: repo1
        volume:
          volumeClaimSpec:
            accessModes:
            - ReadWriteOnce
            resources:
              requests:
                storage: 1Gi
            storageClassName: "standard"
  image: registry.developers.crunchydata.com/crunchydata/crunchy-postgres:ubi8-14.3-0
  instances:
  - dataVolumeClaimSpec:
      accessModes:
      - ReadWriteOnce
      resources:
        requests:
          storage: 1Gi
      storageClassName: "standard"
    name: instance1
    replicas: 3
    minAvailable: 2
  postgresVersion: 14
In the manifest, we specified a cluster, using storageclass named “standard”, with 3 replicas and requiring 2 available. We assume a storage class named “standard” already exists and optimized for database workload. In the manifest, we also configured a backup job. We can apply the manifest and watch for the Pods to come up in a few minutes.
kubectl apply -f test-cluster.yaml
kubectl -n postgres-operator get po --watch
kubectl -n postgres-operator describe postgresclusters hippo
The Pods in the postgres-operator namespace should report something like this:
NAME                           READY   STATUS      RESTARTS   AGE
hippo-backup-mwpm-ps8wk        0/1     Completed   0          21s
hippo-instance1-6mls-0         4/4     Running     0          3m35s
hippo-instance1-hjp6-0         4/4     Running     0          3m35s
hippo-instance1-k4qf-0         4/4     Running     0          3m35s
hippo-repo-host-0              2/2     Running     0          3m35s
pgo-548d5f48bc-9w4z4           1/1     Running     0          8m41s
pgo-upgrade-566b9cc98f-d7gkr   1/1     Running     0          8m41s
Three Pods for PostgreSQL are all up. The first backup run has completed already. We can connect to the cluster using psql following the quick start guide. We can also configure an application. A good example application that uses PostgreSQL database is KeyCloak. We briefly mentioned it in OIDC discussion. Currently the keycloak example on Crunchy pgo’s quick start guide is outdated. Instead, use the following content as keycloak.yaml:
apiVersion: apps/v1
kind: Deployment
metadata:
  name: keycloak
  namespace: postgres-operator
  labels:
    app.kubernetes.io/name: keycloak
spec:
  selector:
    matchLabels:
      app.kubernetes.io/name: keycloak
  template:
    metadata:
      labels:
        app.kubernetes.io/name: keycloak
    spec:
      containers:
      - image: quay.io/keycloak/keycloak:latest
        name: keycloak
        args: ["start-dev"]
        env:
        - name: DB_VENDOR
          value: "postgres"
        - name: DB_ADDR
          valueFrom: { secretKeyRef: { name: hippo-pguser-hippo, key: host } }
        - name: DB_PORT
          valueFrom: { secretKeyRef: { name: hippo-pguser-hippo, key: port } }
        - name: DB_DATABASE
          valueFrom: { secretKeyRef: { name: hippo-pguser-hippo, key: dbname } }
        - name: DB_USER
          valueFrom: { secretKeyRef: { name: hippo-pguser-hippo, key: user } }
        - name: DB_PASSWORD
          valueFrom: { secretKeyRef: { name: hippo-pguser-hippo, key: password } }
        - name: KEYCLOAK_USER
          value: "admin"
        - name: KEYCLOAK_PASSWORD
          value: "admin"
        - name: PROXY_ADDRESS_FORWARDING
          value: "true"
        ports:
        - name: http
          containerPort: 8080
        - name: https
          containerPort: 8443
        readinessProbe:
          httpGet:
            path: /realms/master  # https://stackoverflow.com/questions/70577004/keycloak-could-not-find-resource-for-full-path
            port: 8080
          initialDelaySeconds: 30
      restartPolicy: Always
Once we apply keycloak.yaml, in a minute we should see and be able to port-forward web traffic:
$ kubectl apply -f keycloak.yaml
$ kubectl -n postgres-operator get po -l app.kubernetes.io/name=keycloak
NAME                        READY   STATUS    RESTARTS   AGE
keycloak-7995d78d7c-zjp4d   1/1     Running   0          4m29s
$ kubectl port-forward deploy/keycloak -n postgres-operator 8080:8080
After using the port-forward command, we can browse to web portal on my MacBook by http://localhost:8080 and configure an initial password, as shown here:

In real life system we would need a proper Ingress. After testing, delete the cluster with kind command and specify the cluster name (kind).
Operation Cost
Operation cost is an important consideration. Troubleshooting on Kubernetes platform is in general more complicated than just on a Unix system. Hosting database on Kubernetes requires skills not only on the Kubernetes platform, but also on database. There used to be database administrator positions where someone has to maintain the upgrade, the storage, the replication, the multi-tenancy and the performance optimization of database. With a database hosted on Kubernetes, the database administrator will have to perform all these activities on a containerized platform. This is not an easy undertaking, and in many occasions warrants a full-time position on its own. Therefore, don’t host your database on Kubernetes, unless that is your main business. It is not the technology that shots down this option. It is the operation cost, such as complexity of configuration, and staff skillset, that makes this option not worth it.

